This page serves as the user manual for the WordPress 360 View plugin available here: https://wordpress.org/plugins/360-view/. As of May 2021, “360 View” is the most comprehensive and feature-rich free WordPress plugin for embedding 360-degree photos and videos into your blog posts and pages.
Table of Contents
Features
- Fully supports WordPress Gutenberg Editor as well as the shortcode mode
- Place multiple 360-degree photos and/or videos on the same page
- Host the photos anywhere (your own server, github, cloud drive, someone else’s website, i.e. literally anywhere)
- No 3rd party accounts are required. Uploading your images to a 3rd party server is not required either (though cloud hosting of your images is also supported)
- Add text to your 360-degree photo or video
- Fullscreen mode
- Supports mobile devices and VR headsets
- Supports mobile device and headset position tracking
- Supports adding a 3D text to the image
- Customize the label position and rotation
- Customize font family
- Customize the label size
- Allows rotating the 360-degree photo (level horizon, change the starting point etc)
- Allows defining the viewport width and height
- Supports taking a screenshot from the 360-degree photo
- Allows to play/pause the videos (and no annoying autoplay, respect the visitors of your blog!)
- Supports auto-panning (orbiting)
- You can define the orbiting speed for each of 3 axis independently
- The text label is orbiting as well
Shortcode Mode
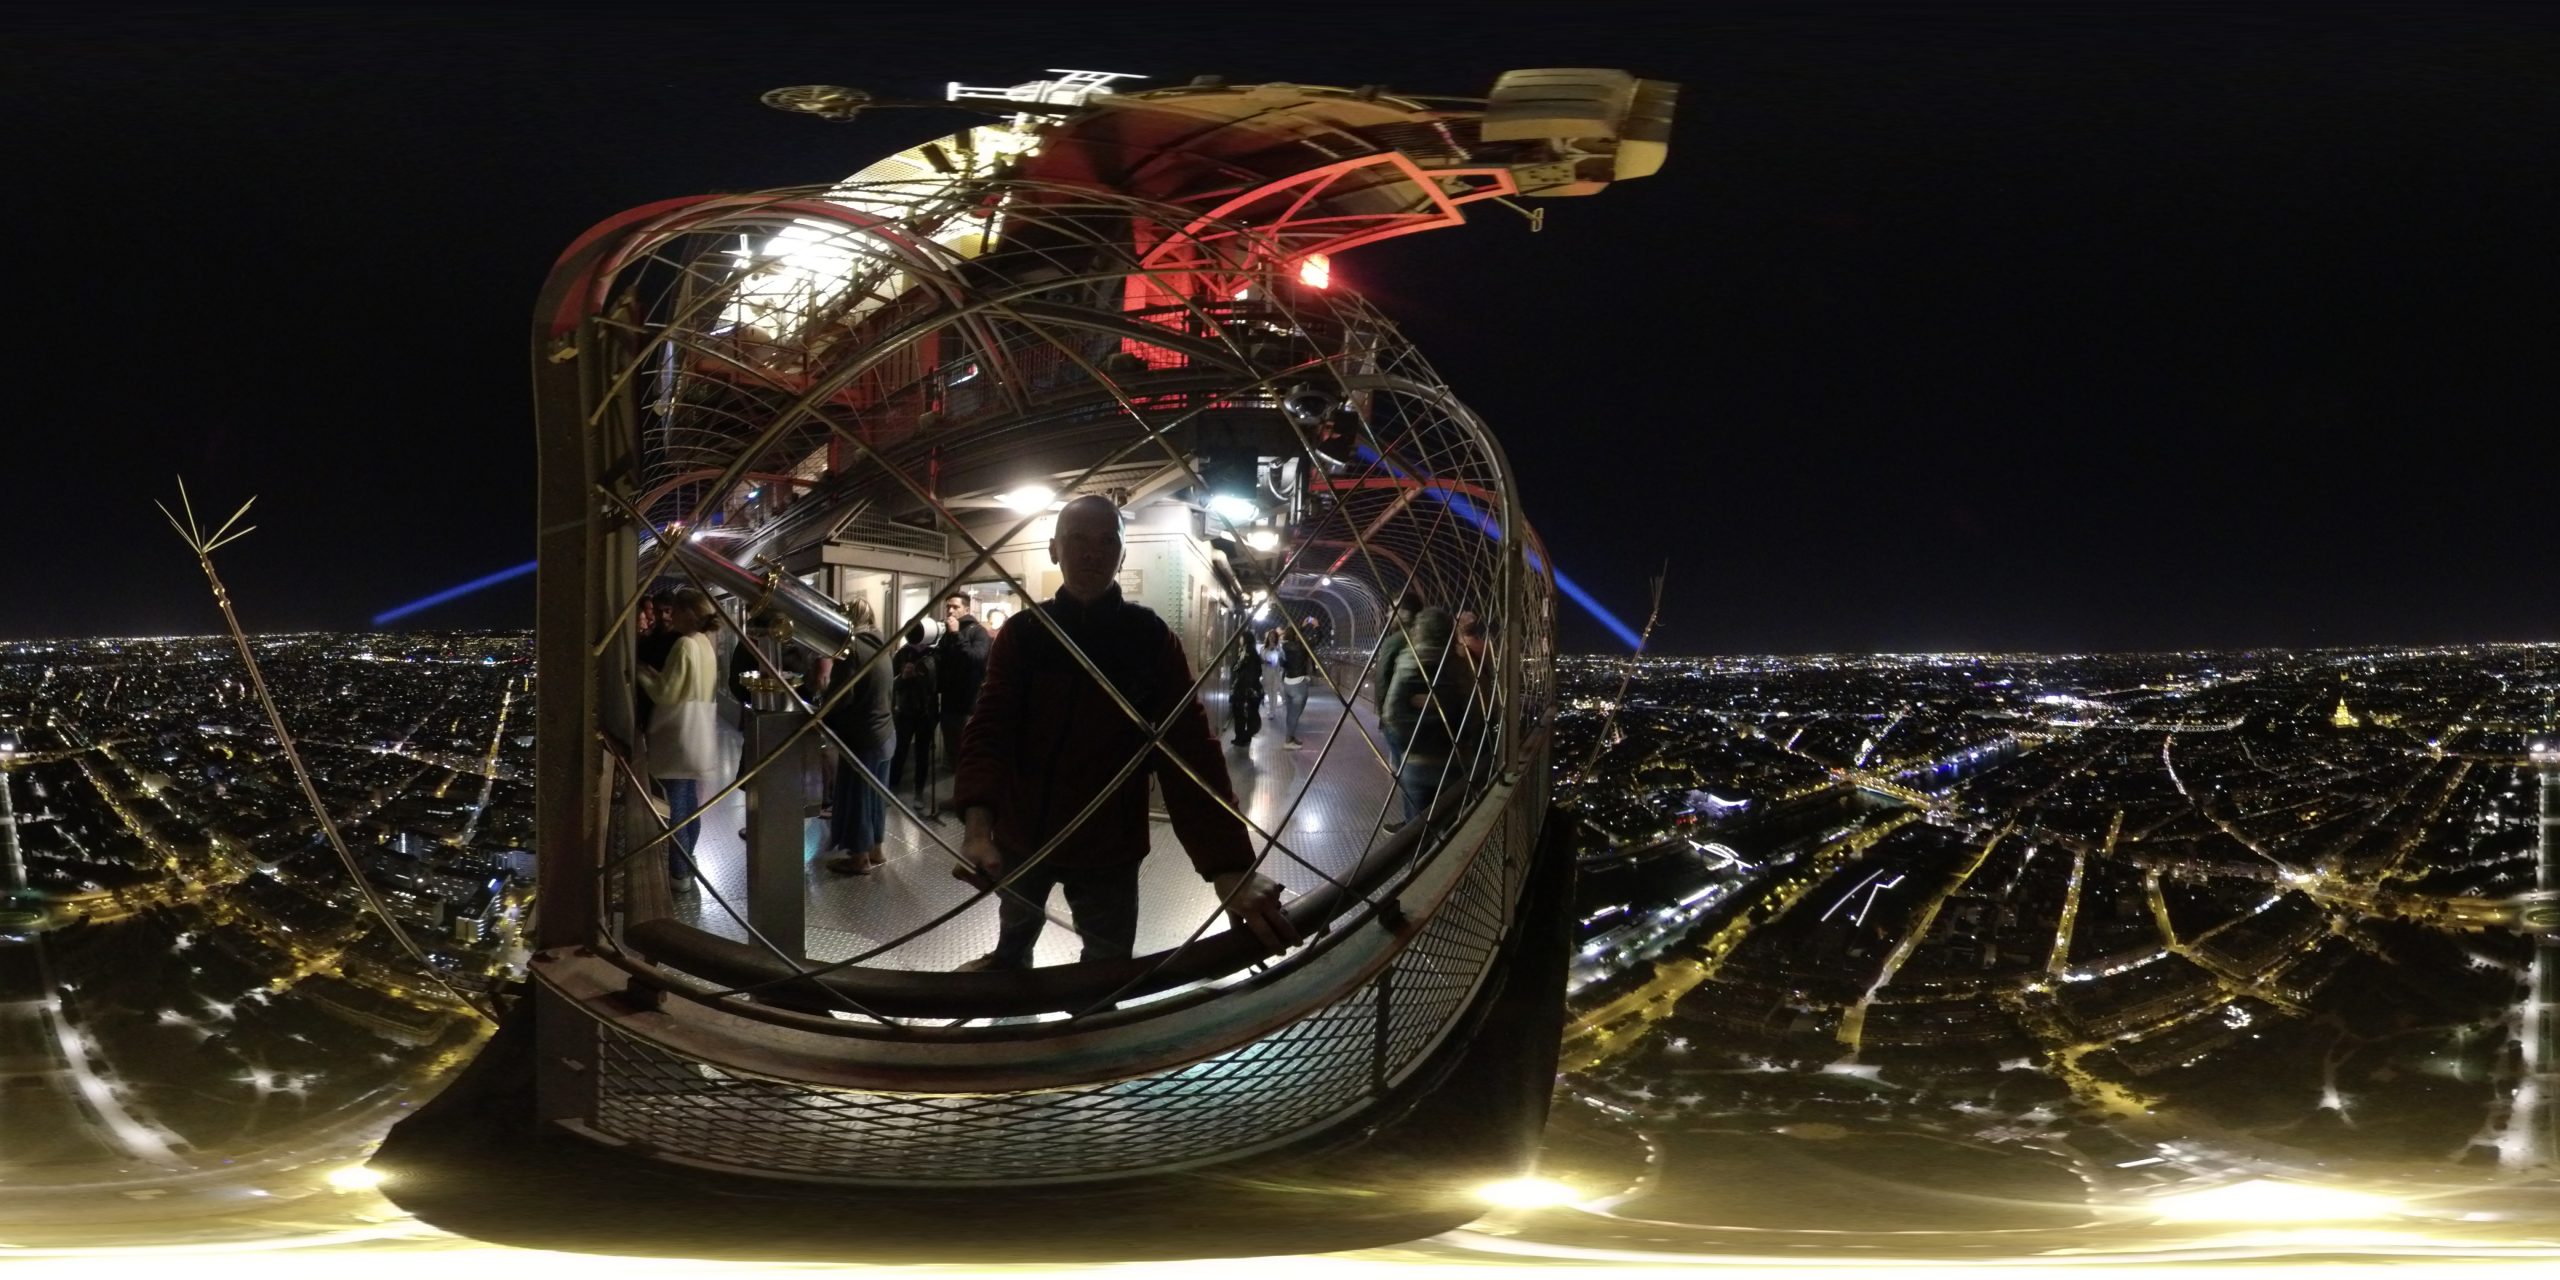
The plugin implements a shortcode “360” which allows you to embed multiple 360-degree images or videos on a single page. For example, the image you see to the left of this text was placed there by adding the following shortcode to this paragraph:[360 src="/wp-content/andrey.mikhalchuk.com/IMG_20180101_051426_00_116-scaled.jpg" text="Paris, France" align="left" width="200px" height="200px" margin="0 10px 0 0" orbiting-type="constant" orbiting-speed="0 -1.5 0"]At the same time, the video (press the “Play” button to play it) on the right was embedded with the following shortcode:
[360 src="/wp-content/andrey.mikhalchuk.com/eiffel-tower.mp4" align="right" width="200px" height="200px" margin="0 0 0 10px" orbiting-type="constant" orbiting-speed="0 1.5 0"]Try dragging either the image or the video with the mouse (or with a finger, if you’re reading this on a mobile device) and you will see that this media is, in fact, a 360-degree panorama, you can look in any direction and interactively experience the majestic view of night Paris from the top of the Eiffel tower or view it from the inside.
Even better, if you will allow your the plugin to access your mobile device’s (phone, or, better, tablet) motion sensors, this will allow you to view the 360-degree photo/video by moving the device around. It will, basically, work as your personal window to Paris. Try it! Since this plugin allows embedding multiple images and videos on the same page, you can even see multiple “windows”, potentially from totally different places showing your the view in sync.
And, yes, viewing Paris through that tiny image is not exactly very immersive, so why don’t you try to click that “VR” button in the bottom-right corner? This will open the full-screen mode and you will have a lot better experience. You can always quit the full-screen mode by clicking “Esc”.
And you can add multiple shortcodes to your page too and use a ton of different attributes with the shortcode in order to customize the presentation of your 360-degree image of video. You can find more demos of this plugin on this page: https://andrey.mikhalchuk.com/2020/07/09/using-360-degree-photos-in-wordpress.html
There are a lot of other features offered by this plugin in the shortcode mode. You can configure all these features by providing any of the parameters listed below with the shortcode. Most parameters have default values also listed in the table, so if you’re fine with that value, you can skip the parameter altogether.
| Name | Default | Description |
|---|---|---|
| width | 100% | The width of the 360-degree viewport |
| height | 400px | The height of the 360-degree viewport |
| margin | 0 auto | CSS specification for the margin surrounding the viewport. You can read more about the CSS margin specification here: https://www.w3schools.com/css/css_margin.asp |
| fov | 80 | A number between 1 and 179 specifying the field of view for the image. If you’re seeing your image being stretched too far near the left and right side of the image, then try reducing this parameter. If you want to fit more into the viewport, then try increasing it, but at a cost of creating the “fisheye” effect. |
| rotation | 0 0 0 | Three numbers specifying the pitch, yaw and roll for your image. If your image is not exactly level or if you want to make the visitor to look up into the sky or down to the ground portion of the image or look more to the left or right – that’s the parameter you need to adjust. Note that the numbers do not need to be whole numbers and they can be negative too. For instance “-0.5 3 5.7” is a perfectly valid value. |
| scale | -1 1 1 | This parameter allows you to stretch your image in any dimension. If the number is negative, then it will flip the image too. Just like with the rotation, the numbers do not have to be whole numbers, “-0.5 3 5.7” is a valid value for this parameter too. |
| text | The text you want to place on the image/video | |
| text-position | -3 2 -3 | This defines the text position on your image/video. |
| text-rotation | 0 0 0 | Similar to the media rotation, this allows rotating just the text. |
| text-font | kelsonsans | This is the name of the font to use with your text. Possible values are – roboto – aileronsemibold – dejavu – exo2bold – exo2semibold – kelsonsans – monoid – mozillavr – sourcecodepro |
| text-scale | 2 2 1 | This allows scaling the text in all 3 dimensions. |
| text-color | red | The color of your text. You can use any CSS-supported color specifications, such as “red”, “#ff0000”, “rgb(255,0,0)” etc. You can read about all possible ways to define CSS colors here: https://www.w3schools.com/cssref/css_colors_legal.asp |
| orbiting-type | none | Setting this parameter to “constant” will keep the camera “orbiting” around your image with a constant speed. |
| orbiting-speed | 0 0.5 0 | This defines the “orbiting” speed in a 3-dimensional space. This allows you to spin your image not only left-right, but also up-down, or keep rotating it in the front of your eyes. And guess what, “-0.5 3 5.7” is a perfectly good example of the orbiting speed specification too. The numbers do not need to be whole, the negative values will spin the image in the direction opposite to positive value and you can specify all 3 to give your visitors a perfect nausea. |
| src | <none> | This is the required parameter and it doesn’t have the default value, because in order to display a media file you need to specify where to get it. You can put here either a relative path or the full URL of the image you want to display. Just make sure that – the server from which you’re embedding this image actually allows you to embed it (check its CORS settings, if you know what it means) – the image/video can be displayed by the browser. E.g. if you open this URL in your browser and see nothing, then you won’t be able to see it using this plugin either. This is mostly related to videos compressed with some unusual codecs. |
| kind | <none> | Set this parameter to “video” if you want the plugin to handle it as a video (required if your video file has an extension other than “.mp4”). By default, the media specified in the “src” parameter is handled as an image. If you see a black empty block instead of your actual video, please – try opening the URL you’re trying to use in the browser and verify that the browser itself is capable of displaying the video – make sure that the server you’re embedding the video from permits embedding in its CORS settings – if you’re using the shortcode, make sure that the quotation marks in the code are the correct ones. For example, if you’re copypasting the code from Microsoft Word or some other “advanced” editor, it may replace the regular quotation mark (“) with the one that looks similar (”), but is not a quotation mark at all. |
| align | <none> | This parameter allows aligning the 360-degree media relative to the rest of the page. Possible values are – left – right – center – wide – tells the media to occupy the entire width of the page, excluding the margins – full – this will display the media as wide as possible, from one side of the browser window to another This parameter doesn’t have the default value either, it will align the image in the way that your browser will decide fits best. Please note that in order for this parameter to work right you need one of the latest versions of WordPress and a theme that supports the alignment properly. This is especially true for the “full” and “wide” alignments. Unfortunately I can’t say that most themes do it right, but these values all work ok with the speck WordPress theme. |
Page Builder (Gutenberg) Block Mode
In this mode, you can visually edit the embedded media and all changes you make to the parameters using the page builder controls will be immediately reflected in the preview.
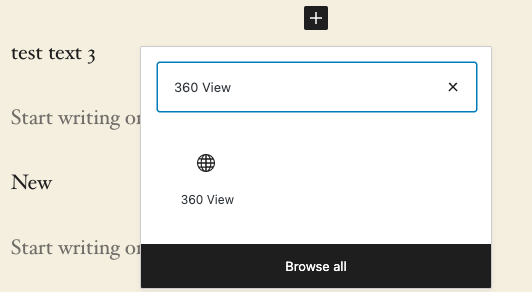
Start by adding a new block (press the “+” button in the page builder) and select “360 View” as the name of the block. If you’re having trouble finding that block type, just type “360 View” into the search and this will filter the block available to you.
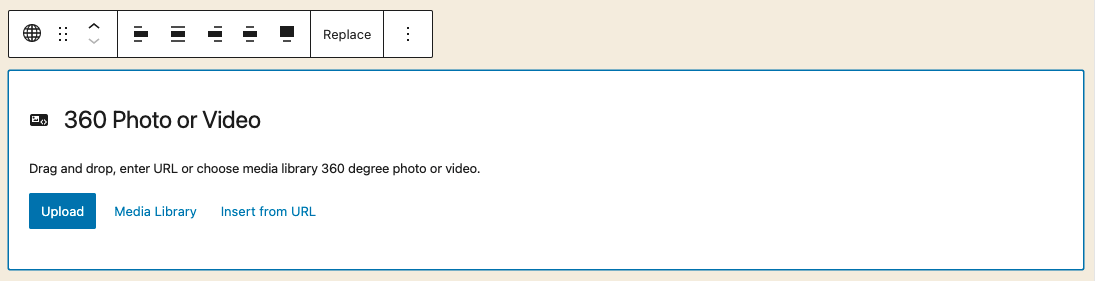
Next you will see the standard WordPress media selector panel similar to the one shown below. Follow the instructions on this panel to select an existing file from the media library or upload a new one.
Once you have the media selected, you will can format the block using one of the two control panels. Let’s start with the one that appears immediately above the block after you select it (by click it, for example).
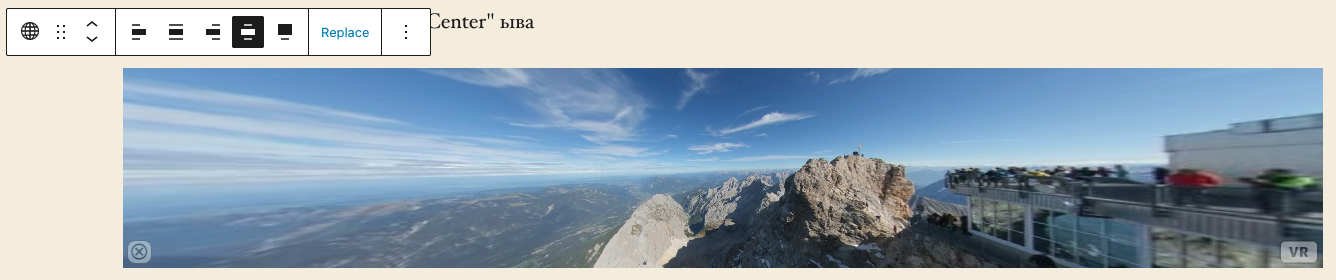
In this control panel you can configure the block alignment. Possible options are:
- “left” and “right” – align the block all the way to the left/right. Note that in some themes that will put the block all the way to the extreme left/right, while in other themes it could position the media on the left/right side of the main layout. Try it and see how the theme handles it.
- “center” – this will safely position the media in the center of the page and it should work the same in most themes
- “wide” – in most themes and layouts this alignment will make the media occupy almost entire width of the page, excluding the margins.
- “full” – in most themes and layouts this will make the media to occupy the entire width of the page disregarding the margins and sidebars.
- no alignment – you can actually uncheck the selected alignment choice and this will mean “no alignment”. The media will be positioned as if there is no alignment specification at all and the way the layout looks will depend on the theme you’re using.
You can also use this control panel to replace the selected media (click “Replace”) or do other standard Gutenberg operations like repositioning the block or adding new blocks.

Now, when we selected and positioned the media, we can start tweaking what’s displayed in the block. For this we will use the right sidebar. If you selected the block and don’t see the right sidebar, please click the “gear” button in the top-right corner of the page and select “Block” tab in the sidebar. The result should look like shown on the picture on the left.
The items in this list basically replicate what the parameters of the shortcode, so please refer to the shortcode section above for more details. Here are some important details you will need to know:
- Unlike many other plugins/blocks (Image to name the one), 360 View doesn’t limit you to specifying the image dimensions in pixels only. You can use any CSS units to define the dimensional parameters. For this reason, when you enter the width/height/etc, you need to enter not just “100” but also specify the units, for instance “100px” or “100%” or “100vw”.
- If you will enter something the plugin doesn’t understand, it will show you the error message. Unfortunately, by default, Gutenberg displays these error messages not where they occur, but at the very top of the page. So if you will see that the “Update” button is disabled, that should give you a hint that you entered an incorrect value. In this case, scroll all the way to the top of the page and read the error message
- Most fields have a default value listed above. If you delete the contents of the field, the default value will be displayed in the background of the input field
- Most numeric parameters (including the groups of 2 or 3 numbers) support not just the positive whole numbers, but also negative and real numbers, for instance “0 -2.718281828459045 3.141592653” is totally ok, though a bit ridiculous
For your convenience, all parameters are grouped into several sections:
- “Media Dimensions” contains the parameters that configure the media (image or video) itself. Here you can set its width, height, rotate or resize it. Field of View parameter will allow you to simulate viewing the image via different types of “lens”. Just move that slider left and right and see what will happen to the image.
- “Text” section will allow you to add a text to the image, define its position, size, rotation, font and color
- “Orbiting” section configures the automated media panning or “orbiting”. Currently only the “Constant” type of orbiting is supported (in addition to “None”), but I plan to add more in the future. Orbiting speed will allow you to specify the speed of the image rotation in the 3-dimensional space
- “Advanced” is a standard Gutenberg section. It allows adding an anchor to your media (so that you can link to it from another part of the page or a completely different website). It also lets you to specify additional CSS classes for the block if you need that.
- “Shortcode Equivalent” – if you will decide to switch from Gutenberg Block mode to shortcode mode, you can copy the shortcode representing the current Gutenberg block settings from this section and paste it anywhere else in your blog as a shortcode. This feature is also useful if you want to interactively tweak your shortcode before pasting it somewhere else.
And a couple of important things to remember about how Gutenberg blocks work:
- Note that the “wide” and “full” alignments naturally assume that the media width is 100%. So when you select these alignments, this will automatically change the image width to 100% (read below about how to change the media width). In the case of “left”, “right” and “center” you can specify any width you want using the standard CSS specification.
- It is also important that after editing the page you review it not only in the Gutenberg editor, but also on the page itself. This is a very important step not just for this plugin or Gutenberg editor, but also for any other plugins and page builders. Specifically Gutenberg is rendering the blocks on the pages very differently than it renders them in the page builder interface.
FAQ
Can I display a 360-degree video with this plugin?
Yes, you can. Just export the video as an H.264-encoded .mp4 file and use its URL in the src attribute (or select it in the media library, if you’re using Gutenberg). If you use some other type of container (i.e. not mp4),
it could work too, but you have to also specify attribute kind=”video” in the shortcode mode.
How many 360-degree photos/videos can I embed on one page?
Technology called WebGL is used to render these 360-degree photos and videos. At the moment, this technology is (artificially?) limited to displaying not more than 16 viewports on the same page. This is not a 360 View plugin limitation, but rather the technology used in the browser itself. For this reason, not only 360 View viewports are counted towards this limit, but also all other objects on the webpage using WebGL. While you still can embed more than 16 viewports on the same page, some of them may not be displayed correctly (and the browser will choose which ones). Also, enabling orbiting in too many images/videos may slow down the browser.
How can I support the developer of this plugin?
- Give this plugin a 5-star rating and a nice review here: https://wordpress.org/plugins/360-view/
- Subscribe to my YouTube channel https://www.youtube.com/rtfms
- Spread the word about this plugin
How do I save a screenshot of the 360-degree viewport?
Click on the photo you wish to save and press Control-Alt-S (yes, it’s still Control-Alt-S even on Mac, not Command-Alt-S). This will save the current viewport. If you want to save the entire photo you need to press Control-Alt-Shift-S.
The center part of the photo looks good, but everything further away from the center looks distorted. How do I fix this?
You may also notice that the parts of the image close to the left and right edges are are moving unnaturally when you’re looking left and right. It looks like one of those photos made with bad fisheye lens. This happens when you’re trying to fit an image into the viewport that’s too stretched horizontally. The photo dimensions are “calibrated” by the vertical
dimension, so the horizontal part gets too stretched at the edges. There are two ways to fix the problem:
– a better way is to always display the image in a viewport with x/y ratio close to 3/4. For instance if you sent the width to 400 then the height should be close to 300
– if the “better” way is not possible due to your page layout then adjust the “fov” parameter. The default is 80, so try to reduce it to 40 or even less for extremely stretched images. This will cause some image quality degradation though because of the limited 360-degree photo/video resolution.
My picture looks like some kind of kaleidoscope. How do I fix this?
360 View plugin only supports equirectangular images (at least at the moment). Check your camera software, most definitely it does
support export in the equirectangular format as it is, possibly, most popular way to save 360-degree images. If you open your image in a regular photo viewer and it looks like two circles, that’s the wrong format and this plugin won’t display it correctly.
For instance, in Insta360 One X Studio 2020 you need to open the .insp
file and export it – that will generate the acceptably formatted image.
My mobile browser shows strange message when I’m trying to view the 360-degree image: “Set your browser to request the mobile version of the site and reload the page to enjoy immersive mode.”. How to fix this?
This message appears in mobile browsers (Mobile Safari for instance) when it’s configured to retrieve the desktop version of the site instead of mobile. You have two options: – Just click “Close” and continue watching the photo/video. You can still navigate it by dragging the viewport with your finger. It’s not impressive though, especially since you may not be able to navigate vertically (depending on your browser). – Configure your browser to request the mobile version. In iOS 13 that’s Settings->Safari->Request Desktop Website->All Websites and turn that off. This will allow you to watch the image by moving your mobile device around, it will work like a “portal” or “window” into the image/video. BTW, this will also fix this problem in Mobile Chrome since in iOS Chrome is Safari-based.
My mobile browser asks “This immersive website requires access to your device motion sensors. (Deny/Allow). What do I do?
You have two options:
– Deny – in this case you will only be able to watch the image by scrolling it horizontally with your finger. That’s less than impressive and very inconvenient.
– Allow – this will allow you to navigate the image by moving the mobile device around. That’s a lot more immersive!
How do I configure video autoplay?
This is not possible, at least not in this version, for couple reasons:
– personally, I dislike autoplay, so don’t wasn’t to spend much time making it possible. Autoplay is highly annoying and, well, disrespectful to your blog readers.
– browsers began their war on autoplay and at the moment they handle it inconsistently. While I can reliably enable it under Firefox and, with some work, under Chrome, it is completely unpredictable and unreliable under Safari.
Bottom line: your blog visitors will need to press the “Play” button in the bottom-left corner of the video in order to play it if they want to.
The video is not playing, I can only see a black rectangle (the audio is playing fine though). How to fix this?
– Most likely there is something wrong with your video.
– Try recreating/reuploading the video file.
– Make sure it uses tested H.264 codec and .mp4 container format.
– if you’re exporting from Insta360Studio, please be aware of the bug it has in export. If you change the resolution, you also need to change the codec to H.265 and then back to H.265, otherwise its export won’t be correct.
– try opening the video in your browser directly. If the browser is not able to play it, then the plugin won’t be able to play it either
– if you’re embedding a video or image from another site, make sure that the site you’re embedding from allows embedding content from it. For example, if you copypaste the shortcode examples from this site tp your page, this won’t work, because I disallowed embedding media from this site on other sites.
My video file is huge, what do I do?
– Good news: most modern web servers (for instance nginx) support sending portions of huge video files. So if your server is configured correctly, it will be responding with HTTP code 206 (Partial Content) and only the portion of the video that will be played will be actually downloaded into the browser
– Try changing the video file resolution. In most cases 1280×640 is sufficient for embedding into your blogposts. Lower resolution requires smaller files.
Can I specify a youtube URL in the src attribute?
It won’t work. This plugin is for embedding 360-degree videos and images, not for streaming youtube (a totally different thing). If you want to embed a youtube (or some other) 360 video, please find a different plugin developed for embedding youtube videos specifically.
I pasted the URL of my video into Gutenberg paragraph block, I’m sure the URL is correct, but I’m getting a black rectangle instead of the video/photo. How do I fix this?
Is the URL in your text shown in blue and underlined? If yes, then WordPress outsmarted you. It decided that since you’re pasting a URL it needs to convert it into
HTML that would make your URL clickable. What you need to do is
– click on your block, a bunch of buttons will appear above it
– click the 3 vertical dots at the top of the block
– select “Edit as HTML”
– replace the text in src=”<replace this text>” with your URL
– optionally, click the three vertical dots again and click “Edit Visually”
Now you should see the URL you pasted in normal color and without the underline and your 360-degree video or photo should render as expected.
An alternative is to always paste the shortcode into into the paragraph text, but into a separate “shortcode” block available in Gutenberg.
Another alternative is to use 360 View Gutenberg block instead of a shortcode.
How to I experience all this VR awesomeness of my blog in a VR headset (for instance Oculus Quest)?
– Launch Firefox Reality (a free app) on Oculus
– Open your blog in Firefox Reality (just type in the URL into the URL bar)
– You can use the controller and try to drag the pictures, but you will only be able to pan then left and right
– For complete immersive experience click the “VR” button in the bottom-right corner of the image
– For videos press “Play” button first and then “VR”
– You may want to stop Orbiting before going into the VR mode, especially if you’re prone to motion sickness.
I specified height=”500″ and the image collapsed into a thin line, what happened?
360 View supports all CSS units in most situations. Please include the unit specification with the width and height. For example, instead of heigth=”500″ please specify height=”500px”.
Same goes for the Gutenberg Block mode, you need to specify the units, otherwise the page won’t save and you will see an error message at the top of the page.
I specified height=”50%” and the image collapsed into a thin line, what happened?
CSS’ “%” specification defines the height relative to the parent element’s height. In many themes/layouts, the height of most elements is not specified in order to make the text and pictures “flow” in responsive layouts, so the “%” specification will not work
If you still want to use the “%” then you need to wrap the 360 View image into a parent element with a fixed height, but then you will need to make sure that tis parent element is also wrapped into an element with known height.
I know this may sound very confusing, but this is not a plugin bug, but rather just how most websites work.
I tried to use one of your examples on my page and it didn’t work. Why?
The examples listed on this page use images hosted on my web server. CORS policy of my server prohibits the images and videos from being embedded on your website. You need to use images hosted on your website.
For example, just for a test, you can download the image you’re trying to embed from my website (for example https://andrey.mikhalchuk.com/wp-content/andrey.mikhalchuk.com/IMG_20180101_051426_00_116-scaled.jpg),
upload it to your website and them try to embed using the URL pointing to the image location on your website.
No matter what I do, I cannot make it work. Can you help?
I can try. First, please read this page in full. Very likely you will find an answer to your question here. If this won’t help, then
– post the description of your problem on the plugin support page: https://wordpress.org/support/plugin/360-view/
– provide as many details as possible
– make sure you included the link to the page on your website reproducing the problem
– if you’re using a shortcode to embed the image/video, please include the full shortcode you are using
I can’t promise immediate help and guarantee the problem resolution, but I’ll try to do my best as soon as I have time.
Also, the wordpress community is awesome and someone from the community may be able to help you.
The images overlap with the rest of the contents, why?
This happens in some themes when you use alignments “left” or “right”. If you’re using Gutenberg, try using “columns” or “table” block and insert the 360 View into the column/cell of that block with no alignment specified. This should help. Alternatively, you may try to use a different theme.
Can I use this plugin with Elementor (Divi, Beaver Builder, WPBakery etc)
You can use this plugin in shortcode mode with any WordPress page builder. Here are a few links on the subject:
– How to use Shortcode Widget in Elementor: https://elementor.com/help/shortcode-widget/
– How to add WordPress Shortcode in Divi Page Buidler: https://www.wonderplugin.com/divi-theme/how-to-add-wordpress-shortcode-to-divi-page-builder/
– How to add a shortcode in WP Bakery Builder: http://superstorefinder.net/support/knowledgebase/add-shortcode-wp-bakery-builder-visual-composer/
When I insert the block, it doesn’t look like the picture, there is are “wide” and “full” alignment options etc. How to fix this?
It looks like you’re running a very old version of WordPress. Gutenberg editor keeps changing quickly and without maintaining the backward compatibility. For this reason (and many other reasons including security), you should keep your WordPress updated.
Surely, 360 View is not the best free plugin of its kind …
Decide for yourself. Before writing this plugin I tried to use the existing plugins. I’m maintaining the complete list of the plugins I tried (i.e. the competition) here: https://andrey.mikhalchuk.com/best-free-360-degree-panorama-plugins-for-wordpress. Also, please let me know if that list is missing anything, I’ll be happy to give a try to a new plugin. Also https://www.youtube.com/watch?v=KM2K7sV-K74
Testing
This plugin was tested with multiple versions of WordPress and several themes. Unfortunately, WordPress Gutenberg is a less than ideal piece of software having a lot of bugs and pretty “unusual” architecture (don’t take my word for this, check its ratings on WordPress.com and google around. You will find ton of complaints from other users and developers).
A lot of effort was put into testing this plugin’s functionality under multiple versions of WordPress with several different themes. Unfortunately, because of Gutenberg’s shortcomings, and difficulties theme developers experience with it, not all themes and WordPress versions will be compatible with the plugin.
Please feel free to post the problems you experience to the plugin support page here: https://wordpress.org/support/plugin/360-view/. Either I or the wonderful WordPress community will try to help, but please understand that some problems we won’t be able to help with, because we can’t just rewrite Gutenberg into something that just works, has no bugs and a reasonable architecture. In some cases, your best workaround would be to use the shortcodes, that work just everywhere, with any page builder or without a page builder at all.
Thank you for your patience and understanding!
Advanced Tuning
In the case you will want to do some additional style tweaks to the plugin, here are a few hints:
- If you will need to override the media presentation, here is what the view renders into:
<div class="wp-block am360view-wrapper" data-align="" style="width:100%">
  <iframe src="about:blank" class="am360view" style="height: 400px; margin: 0px auto; border: 0px; width: 578px;" "... the plugin configuration goes here as data-... parameters "></iframe>
</div>- The same code (wrapper + iframe) goes into both the shortcode-generated code and the Gutenberg-generated code
- So if you need to style the wrapper, you can style it for div.am360view-wrapper.
- In some cases you will need to add the “!important” to your specification. Why? Thank gutenberg, in some cases it automatically recalculates some attributes and injects them into the resulting code as “style” specification. In other cases it’s just gutenberg bugs. There are a lot of hoops to jump through when styling a gutenberg block …
- If you want to inject some Javascript code working with the views, you can address all views on the page as “iframe.am360view”
- I made some parameters like width, height and margin accessible via the shortcode attributes and Gutenberg block settings. Let me know if you will need more parameters to be accessible and I may be able to include them in the next version.

![Stop Paying for SSL Certificates! [Photo by Jason Dent on Unsplash]](https://andrey.mikhalchuk.com/wp-content/andrey.mikhalchuk.com/safe-675x360.jpg "Stop Paying for SSL Certificates!")